
006
Guided Build
Beginner
LED Bar
One LED is a signal. Ten LEDs become a meter.
Mission: build a tiny level meter
The LED bar graph is ten LEDs in one package. In this lesson, each segment gets its own GPIO output and resistor path.
You will learn the programming move that makes ten outputs manageable: put related pins into a list, then use loops instead of repeating nearly identical code ten times.
Pin orientation
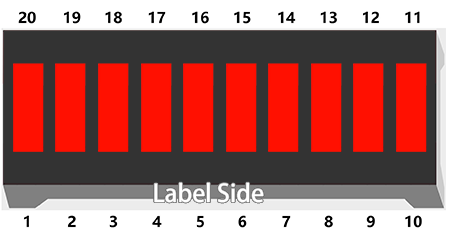
Treat the bar graph like ten separate LEDs sharing one plastic body. The package orientation matters.
Before wiring, identify which side is the anode side in the SunFounder reference and compare it with the markings on your actual part. If the bar is rotated 180 degrees, every segment mapping will feel wrong.
Circuit map
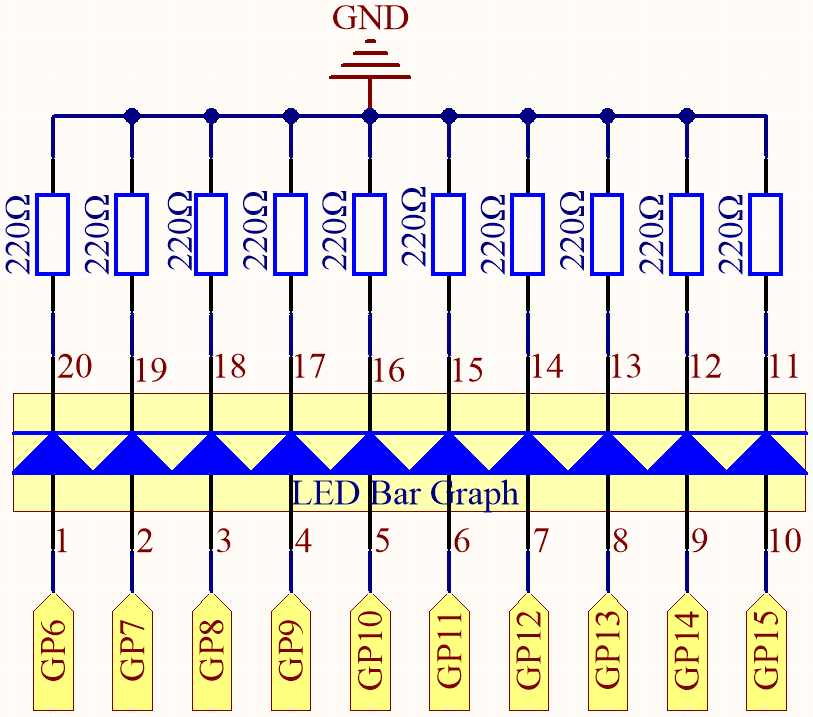
The key idea is repeated ten times:
- GPIO pin goes high.
- Current goes through one LED segment.
- A 220 ohm resistor limits current.
- The path returns to GND.
Turning on all ten LEDs draws more current than turning on one. Keep the resistors in place and do not bypass them.
Breadboard wiring
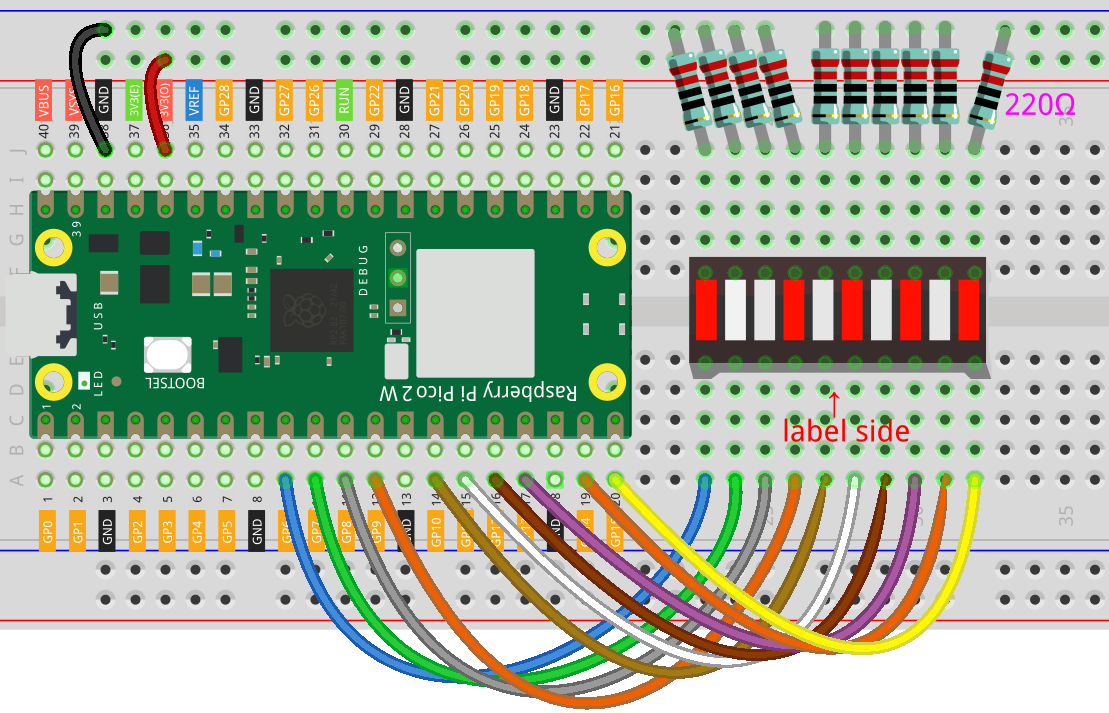
Wire GP6, GP7, GP8, GP9, GP10, GP11, GP12, GP13, GP14, and GP15 to the ten segments according to the diagram.
Debug habit: after wiring, count the GPIO pins out loud from 6 to 15 while pointing at each connection. A skipped number usually means a skipped row.
Code: rise and fall
from machine import Pin
from time import sleep

pin_numbers = [6, 7, 8, 9, 10, 11, 12, 13, 14, 15]
segments = [Pin(number, Pin.OUT) for number in pin_numbers]

def set_level(count):
    for index, segment in enumerate(segments):
        segment.value(index < count)

while True:
    for level in range(0, len(segments) + 1):
        set_level(level)
        sleep(0.15)

    for level in range(len(segments), -1, -1):
        set_level(level)
        sleep(0.15)
How the code scales up
pin_numbers is a list of the GPIO numbers you wired. Lists keep related values together in order.
segments = [Pin(number, Pin.OUT) for number in pin_numbers] creates one Pin output object for every GPIO number. This is called a list comprehension: a compact loop that builds a new list.
set_level(count) is a helper function. If count is 4, the first four segments turn on and the rest turn off.
enumerate(segments) gives both the position number and the segment object. That lets the code ask, is this segment index lower than the desired level?
range(0, len(segments) + 1) counts from 0 up through 10. The second range counts backward to create the falling animation.
Debug checklist
If one segment is dark:
- Check that segment's resistor and row.
- Check the matching GPIO wire.
- Swap in a known-good resistor if needed.
If the animation runs backward, the bar graph is probably rotated or wired from the opposite end. That can be okay if you understand it; fix the physical wiring if the displayed direction matters.
If several segments behave together, look for breadboard rows that accidentally connect or a missing ground path.
Remix: make a scanner
Replace set_level with a one-dot scanner:
def set_single(active_index):
for index, segment in enumerate(segments):
segment.value(index == active_index)
Then loop through active_index from 0 to 9 and back. This changes the display from a level meter to a moving dot.
Checkpoint
Mark complete when:
- All ten LED bar segments can light.
- The level rises and falls from code.
- You can explain why the list is better than ten separate variable names.
- You can identify at least one segment by GPIO number.
Private Dev Log
Write a short build note:
1. The hardest segment to wire was...
2. A list helped because...
3. One display idea for an LED bar is...
References
Primary build reference:
https://docs.sunfounder.com/projects/pico-2w-kit/en/latest/pyproject/py_led_bar.html
MicroPython API reference:
https://docs.micropython.org/en/latest/library/machine.Pin.html